by James Williams
Some people may find the idea of using an air compressor rather arduous due to the fact that this paraphernalia tends to make a lot of noise.
Despite that, people still use air compressors because of how efficient and useful they are. This is giving rise to a considerable number of air compressor companies in the market.
One of the most prominent companies out there is Porter Cable. Not only do they make superb air compressors, but their ones are also much easier to use, both at home and work.
Knowing how to use Porter Cable air compressor is not an issue, and you will soon find yourself working with your air compressor more frequently. To help you get started, we have compiled a list of the steps that need to be carried out to help you understand the process of using a Porter Cable air compressor.
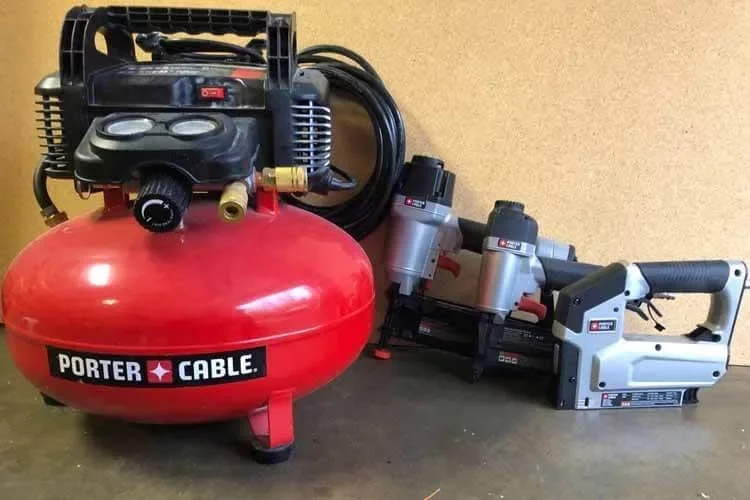
Before you start working with your air compressor, you will have to take it out of where it is kept and connect it to the power supply. However, do not turn it on just yet. Next, you will have to trace three valves on your air compressor- two on either side and one at the base of the machine.
Once you have successfully found the valves, you will have to make sure that the one at the bottom of the compressor is tightened. If you find it loose, then tighten the valve yourself by turning it in a counterclockwise direction before proceeding to step 2.
The air hose that will accompany the air compressor in its box must be fitted on to the air compressor.
There are generally two different ways of doing this: it can be fixated directly on the outlet port, which can usually be found at the top of the air compressor. Otherwise, the hose can also be connected to the quick-connect fitting to get the desired result.
However, the initial assembly of the air compressor plays a significant role in this matter, so do make sure to read the instructions manual thoroughly before starting on anything.
Next, connect your air compressor to a power outlet that generates the current ideally required by your air compressor (this will usually be around 15 amperes or so).
Afterward, turn your air compressor on from both the power supply and by also flipping the switch on the machine itself. You will know that you have turned it on when you hear a loud uproar, which is nothing to be afraid of, as this is simply your machine compressing the air that is surrounding it.
The PSI value, otherwise known as the pounds per square inch value, determines how much force is acting on a certain area of your compressor. You will be able to see what this value is with the help of a regulator.
Your Porter Cable air compressor is most likely to come with a booklet or an instruction manual, stating what PSI value the machine is most compatible with.
We would advise you not to let the value go past the number stated in the manual as it will lead to the reduction of your air compressor's shelf-life.
However, you need not worry too much about when you should be turning it off since most Porter Cable air compressors usually come equipped with an auto-off system. This system lets the machine turn its pressure switch off the moment its tank has been filled to its maximum capacity.
The last step that you will have to follow before you can start working on your project is to attach any tool of your liking to your air compressor. If the previously mentioned steps were followed correctly, you should be able to carry out this step with ease.
You will have to connect your tool to the end of the hose that is farthest from the air compressor. To do so, you will have to hold down the knob of the pressure regulator and keep twisting it in a clockwise direction until the gauge that measures pressure recognizes the correct pressure needed for your tool.
Once you are done working on your project, be sure to take off the cover of the drainage valve located at the underside of the compressor by turning the thumbscrew in a counterclockwise direction. This will cause all the air inside your compressor to flow out and keep it well-prepared for the next time you will need to use it.
Even if you know how to make use of a porter cable air compressor, there are still some tips that you should always keep in mind:
This is a given for every air compressor or electrical devices that you use, and Porter Cable air compressors are no exception. Always remember to do exactly as the instruction manual says since it is compiled by experts who know what they are saying.
This is for when and if you do not wish to attach the air pipe and your tools to the quick-connect setting. If you are not using that setting, then you should consider getting a roll of plumber's tape that you can use to fasten the hose.
You should expect a lot of flying rubble and other tiny fragments of whatever you will be working with when you are operating an air compressor. The chances of these stray rubble coming in contact with your eyes are high and so always remember to wear safety goggles when working.
Side by side, try not to lean too close to your workbench as you may get injured in other areas as well.
This brings us to the end of our article for today, and we hope we were able to help you understand better how to use Porter Cable air compressor. Thank you for reading till the end!

About James Williams
Hi, This is James from HomerDIY. I have great experience in writing about everything related to Pump and DIY tools. For the last few years, I am researching the different types of tools and sharing my opinion on this blog.
 |
 |
 |
 |
Popular Posts
 Homer
Homer